How to setup Drools Workbench in local machine with docker
Drools is a Business Rules Management System(BRMS). It provides a rule engine to that helps you separate your business logic from your code. You can write the code in drl file or excel file and use it in the program. But drools provides a much better way of doing this. It provides an out of the box business central for managing all the drools rule files and other objects. Along with the business central you would also need a kie server to deploy the rules and use it. Let’s see how we can easily set it up with docker images. Make sure docker is installed in your system before you begin. For the easiness of demonstration I will use the showcase image. It comes with added users and roles. First spin up the business central with the following docker command. To know more about the showcase image and the inbuilt roles that comes with it refer here.
docker run -p 8080:8080 -p 8001:8001 -d — name drools-wb jboss/business-central-workbench-showcase:latest
Next spin up the kie server with the following command.The kie server always need a user kieserver. The showcase image already has user added to it with password kieserver1!. For more information on showcase image refer here.
docker run -p 8180:8080 -d — name kie-server — link drools-wb:kie-wb jboss/kie-server-showcase:latest
In the above command you can see that the drools-wb image is being linked with the kie server. Make sure you use drools-wb as the image name in first command. You can also see the port 8180 being binded to the port 8080.Wait for sometime for the business central to be up and running. Now go to the your browser and access the following url to access the business central.
You will get a window to login. use admin for both username and password.
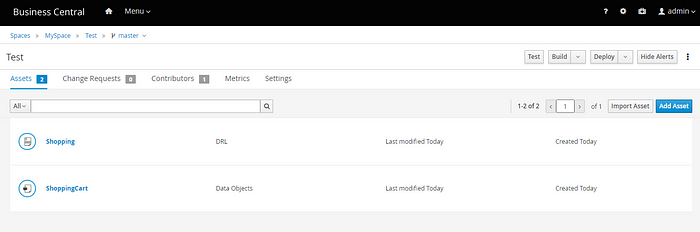
Now go to projects in design. Create a simple project Test as shown in figure below. Give the package name as com.myspace.test

Add a simple Data object called ShoppingCart from the as shown in following figure below. Select a package from drop down as com.myspace.test

Add a property as shown below.

Now add a drl file from the same place where we selected DataObject.

The rule content is shown below.
package com.myspace.test;
import java.lang.Number;
rule “Apply Tall Order Discount”
dialect “mvel”
no-loop true
when
$sc : ShoppingCart( $tp : totalPrice >= 10000.0B )
then
modify( $sc ) {
setTotalPrice( $tp*0.5 )
}
end
Save the rule. Click on the build and deploy button on the top right as shown in the figure below.
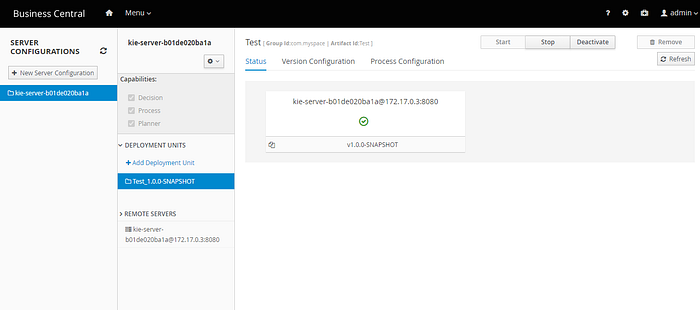
Now go to the Execution servers in deployment and you will see your rules has been deployed.
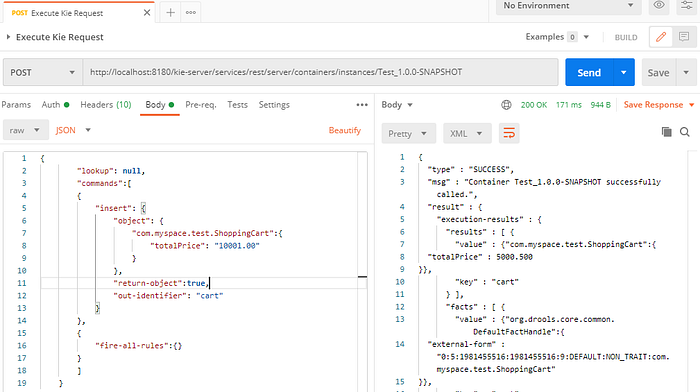
Now go to Postman and execute a POST request to the following URL.
http://localhost:8180/kie-server/services/rest/server/containers/instances/Test_1.0.0-SNAPSHOT
give the body as shown below.
{“lookup”: null,
“commands”:[
{“insert”: {“object”: {
“com.myspace.test.ShoppingCart”:{
“totalPrice”: “10001.00”
}},
“return-object”:true,
“out-identifier”: “cart”
}},{
“fire-all-rules”:{}
}]}
Select basic auth give username as kieserver and password as kieserver1! .
Execute the request and you will get a success response with executed values. The snip is shown below.
Thanks for reading me. As always, feedback and suggestions are welcome.
If you found this article useful then give it some claps and follow me!